0xc000000e błąd podczas próby rozruchu systemu Windows oznacza, że masz do czynienia z uszkodzonym Boot danych konfiguracyjnych. Dane konfiguracji rozruchu to globalny magazyn wszystkich opcji i ustawień związanych z uruchamianiem na nowszych komputerach z systemem Windows.
Wystąpi ten błąd podczas próby uruchomienia urządzenia, a zostanie wyświetlony czarny ekran z instrukcjami naprawy komputera za pomocą dysku instalacyjnego lub dysku odzyskiwania. Niestety posiadanie tego dysku odzyskiwania to jedyny sposób rozwiązania tego problemu, dlatego przed rozpoczęciem należy go zdobyć. Jeśli go nie masz, dość łatwo jest go utworzyć za pomocą narzędzia Rufus lub Windows Media Creation z dowolnego innego komputera lub laptopa.

Będziesz także musiał uruchomić system BIOS, aby zmienić kolejność rozruchu i uruchomić komputer z dysku odzyskiwania zamiast z dysku twardego. Aby to zrobić, wykonaj następujące czynności:
- Wprowadź ustawienia BIOS lub UEFI , naciskając klawisz wyznaczony przez producenta płyty głównej przed uruchomieniem systemu Windows. Ten klawisz to zwykle Esc, Delete, F2, F8, F10, F12 lub Backspace, w zależności od producenta. Możesz wyszukać online, jak wejść do BIOS, a następnie model komputera.
- Po wejściu do środka przejdź do rozruchu Skorzystaj z instrukcji znajdujących się w systemie BIOS, aby zmienić kolejność rozruchu i ustaw dysk CD-ROM lub port USB jako pierwsze urządzenie, w zależności od tego, czy dysk odzyskiwania jest dyskiem CD, czy dyskiem flash .
- Zapisz ustawienia i zakończ.

Metoda 1: Odbuduj dane konfiguracji rozruchu
Aby to zrobić, musisz uruchomić komputer z dysku odzyskiwania. Jeśli skonfigurowałeś BIOS zgodnie z powyższymi krokami, możesz to zrobić, naciskając dowolny klawisz po wyświetleniu monitu na ekranie. Po uruchomieniu komputera z dysku odzyskiwania wykonaj następujące czynności, aby odbudować BCD:
- W oknie dialogowym Instalatora systemu Windows ustaw wszystkie odpowiednie wartości, wybierz język i kliknij
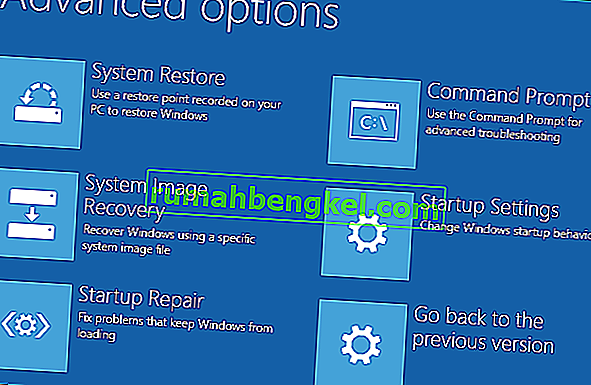
- W lewym dolnym rogu kliknij Napraw komputer i wybierz Rozwiązywanie problemów z ekranu Wybierz opcję.
- Na ekranie Rozwiązywanie problemów kliknij Opcje zaawansowane i kliknij Wiersz polecenia.
- Po otwarciu wiersza polecenia wpisz następujące polecenia, naciskając klawisz Enter na klawiaturze po każdym z nich:
bootrec / scanos bootrec / fixmbr bootrec / fixboot bootrec / rebuildbcd
- Uruchom ponownie komputer i powinien uruchomić się dobrze, bez ponownego rozwiązywania problemu.

Metoda 2: Napraw system operacyjny za pomocą dysku odzyskiwania
Ta metoda naprawi również system operacyjny za pomocą wiersza polecenia dysku odzyskiwania i powinieneś być w stanie uruchomić system Windows bez ponownego rozwiązywania problemu. Uruchom komputer z dysku odzyskiwania i postępuj zgodnie z poniższymi instrukcjami.
- Wykonaj kroki od 1 do 3 z poprzedniej metody, aby przejść do wiersza polecenia dysku odzyskiwania.
- Po wejściu do wiersza polecenia wpisz poniższe polecenia, a następnie naciśnij klawisz Enter na klawiaturze, aby je wykonać. Narzędzie StartRep.exe poprawia wartości środowiska rozruchowego i powinno naprawić błąd BCD. Zwróć uwagę, że może być konieczne wielokrotne powtórzenie tego kroku w przypadku niepowodzenia.
cd x: \ sources \ recovery StartRep.exe
- Jeśli poprzedni krok naprawy systemu Windows nie pomógł, wpisz bcdedit w wierszu polecenia, aby zobaczyć wartości dla Menedżera rozruchu systemu Windows.
- Zanotuj wartości urządzenia . Jeśli są nieznane , wpisz następujące polecenia, po każdym z nich naciśnij klawisz Enter, aby je wykonać. Zwróć uwagę, że w razie potrzeby powinieneś zamienić C: na partycję, na której jest zainstalowany system operacyjny.
bcdedit / set {DEFAULT.EN_US} partycja urządzenia = c: bcdedit / set {DEFAULT.EN_US} osdevice partition = c: bcdedit / set {BOOTMGR.EN_US} partycja urządzenia = c:- Po zakończeniu działania wiersza polecenia zamknij go, wyjmij dysk odzyskiwania i uruchom ponownie system. Nie powinno teraz mieć żadnych problemów z uruchomieniem.
Jedynym minusem tych rozwiązań jest to, że wymagają one regeneracji sił, cierpliwości i mocnych nerwów. Jeśli jednak zastosujesz się do nich zgodnie z opisem, powinieneś naprawić otrzymany błąd i kontynuować korzystanie z urządzenia tak, jak wcześniej.
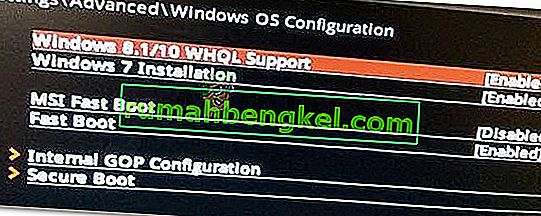
Metoda 3: Włącz obsługę Windows 10 WHQL w systemie BIOS
U niektórych producentów OEM istnieje ustawienie obsługi systemu Windows 10 WHQL. Ma dwie podstawowe funkcje: sprawdza podpisane sterowniki podczas procesu rozruchu i umożliwia włączenie obsługi UEFI. Jeśli używasz systemu Windows 10, musisz go włączyć, a następnie komputer będzie mógł normalnie uruchomić się. Jeśli jednak nie jest zaznaczone, komputer może uruchomić się z błędem 0xc000000e. Możesz więc uzyskać dostęp do systemu BIOS, aby sprawdzić, czy ustawienie Obsługa systemu Windows 10 WHQL jest włączone. Jeśli nie, włącz go, aby spróbować.
Należy pamiętać, że ustawienie Obsługa Windows 10 WHQL nie jest obsługiwane na wszystkich komputerach. Jeśli Twój komputer go nie ma, możesz przejść do sprawdzenia, czy obsługa UEFI jest włączona na Twoim komputerze. Jeśli nie, możesz go włączyć, aby zobaczyć, czy kod błędu 0xc000000e znika. Aby to włączyć:
- Wyłącz całkowicie komputer i pozostaw go na co najmniej kilka minut.
- Po upewnieniu się, że upłynął odpowiedni czas, uruchom kopię zapasową komputera i powinieneś zauważyć opcję „ Naciśnij ten przycisk, aby uruchomić system w trybie Bios ”.
- Naciśnij przycisk, aby uruchomić komputer w trybie Bios.
- Po pomyślnym uruchomieniu w trybie Bios sprawdź, czy w systemie Bios jest ustawienie Windows WHQL.
- Jeśli jest obecny, naciśnij „Enter”, aby go wybrać po zaznaczeniu go za pomocą klawiszy strzałek i wybierz opcję „Włączone” , aby włączyć go na swoim komputerze.
- Sprawdź, czy to rozwiązuje problem.

Jeśli błąd rozruchu systemu Windows 10 0xc000000e nadal pojawia się po włączeniu ustawienia obsługi systemu Windows 10 WHQL lub obsługi UEFI, może być konieczne zresetowanie konfiguracji BIOS / UEFI na komputerze.
Metoda 4: Odbuduj BCD za pomocą Easy Recovery Essentials
Easy Recovery Essentials to funkcja zautomatyzowanej naprawy systemu jednym kliknięciem, która obejmuje pełną naprawę i rekonstrukcję BCD w celu rozwiązania błędu „0xc000000e”, nawet w przypadkach, gdy system Windows nie uruchamia się w wyniku błędu.
Składnik automatycznej naprawy rozruchu EasyRE zajmie się wszystkimi problemami związanymi z BCD, naprawi BCD lub odtworzy go od podstaw przy użyciu prawidłowego kodowania i ścieżki dla partycji, która odmawia prawidłowego załadowania. Oznaczy również dysk jako online, aby upewnić się, że działa poprawnie.
Program Easy Recovery Essentials gwarantuje automatyczne naprawienie błędu „0xc000000e” za pomocą wbudowanej opcji automatycznej naprawy. EasyRE jest obecnie dostępne dla systemów Windows XP, Vista, 7, 8, 10 i można je pobrać i utworzyć na dowolnym komputerze.
- Zdobądź inny komputer, którego możesz użyć do utworzenia USB, z którego będziemy korzystać do uruchamiania komputera.
- Pobierz Easy Recovery Essentials stąd.

- Wypal obraz.
- Uruchom komputer z utworzonego dysku CD Easy Recovery Essentials lub USB.
- Po uruchomieniu EasyRE wybierz opcję „Automatyczna naprawa” i kliknij Kontynuuj.
- Po przeskanowaniu dysków komputera przez EasyRE zidentyfikuj i wybierz z listy literę dysku dla instalacji systemu Windows, a następnie kliknij opcję Automatycznej naprawy, aby rozpocząć.
- Program Easy Recovery Essentials rozpocznie analizę wybranego dysku pod kątem problemów. EasyRE sprawdzi i spróbuje automatycznie poprawić błędy dotyczące dysku, partycji, sektora rozruchowego, systemu plików, programu ładującego i rejestru. Nie jest wymagana żadna interwencja, ponieważ naprawa EasyRE jest w pełni zautomatyzowana.
- Po zakończeniu procesu EasyRE zgłosi swoje ustalenia. Kliknij przycisk Uruchom ponownie , aby ponownie uruchomić komputer i przetestować zmiany.

Metoda 5: Zresetuj konfigurację BIOS / UEFI
Niektórzy użytkownicy powiedzieli, że ich problem z błędem 0xc000000e został rozwiązany poprzez zresetowanie konfiguracji BIOS / UEFI. Możesz więc rozważyć wypróbowanie tej metody, aby sprawdzić, czy ten problem można rozwiązać.
Krok 1. Otwórz menu BIOS
Aby zresetować BIOS do ustawień domyślnych, musisz uzyskać dostęp do menu BIOS i najpierw znaleźć opcję Ustawienia domyślne.
Użytkownicy systemu Windows 10 mogą uzyskać dostęp do zaawansowanych opcji uruchamiania systemu Windows 10 i wejść do menu systemu BIOS. Możesz kliknąć Start -> Zasilanie, nacisnąć i przytrzymać klawisz Shift, a następnie kliknąć przycisk Uruchom ponownie, aby ponownie uruchomić system Windows w środowisku odzyskiwania systemu Windows. Następnie kliknij Rozwiązywanie problemów -> Opcje zaawansowane -> Ustawienia oprogramowania układowego UEFI i kliknij Uruchom ponownie, aby przejść do ekranu ustawień BIOS.
Alternatywnie możesz również normalnie ponownie uruchomić komputer i nacisnąć wymagany klawisz na ekranie startowym, aby uruchomić komputer w oknie ustawień BIOS. Skrót klawiaturowy różni się od różnych producentów komputerów i może to być F12, Del, Esc, F8, F2 itd.
Krok 2. Znajdź opcję Ustawienia domyślne
Nazwa i lokalizacja opcji „Ustawienia domyślne” mogą być różne na różnych komputerach. Zwykle wywołuje to: Załaduj domyślne, Załaduj domyślne ustawienia, Załaduj ustawienia domyślne, Załaduj domyślne ustawienia BIOS, Załaduj optymalne ustawienia domyślne itp.
Użyj klawiszy strzałek na klawiaturze komputera, aby znaleźć domyślną opcję konfiguracji BIOS na ekranie ustawień BIOS. Możesz go znaleźć na jednej z zakładek BIOS-u.
Krok 3. Zresetuj BIOS
Po znalezieniu opcji Załaduj domyślne ustawienia konfiguracji możesz ją wybrać i nacisnąć przycisk Enter , aby rozpocząć resetowanie systemu BIOS do domyślnych ustawień fabrycznych w systemie Windows 10.
W końcu możesz nacisnąć F10, aby zapisać i wyjść z BIOS-u. Twój komputer automatycznie uruchomi się ponownie. Jeśli w przyszłości zajdzie potrzeba ponownej zmiany ustawień systemu BIOS, postępuj zgodnie z tymi samymi instrukcjami, aby ponownie uzyskać dostęp do systemu BIOS w celu zmiany.
Metoda 6: Oznacz dysk rozruchowy jako online
It is possible in some cases, that the disk that you have connected to the computer or the USB that you are trying to boot from has been marked as offline by the computer. Some computers tend to prevent extra applications, hardware, and other things from being able to run as soon as the computer starts because it allows for more convenient and fast startup experience. Therefore, in this step, we will be marking the Disk as online.
You still need to use a bootable USB medium to do this job. We will show you a step-by-step guide here:
- After booting your computer from the bootable USB drive, you need to go to Next > Repair your computer. Then, you will enter WinRE.
- Go to Troubleshoot > Advanced options > Command Prompt.

- Make sure to properly enter your login credentials if you are asked by the computer.
- Type in the following command inside the command prompt to successfully launch the disk part utility on your computer.
diskpart
- Type in either one of the following commands in the next window to list the currently connected disk drives to your computer.
List Disk List Volume
- Once the disks have been listed, you need to identify the disk that contains the Windows operating system and the one that you want to mark as active.
- After identifying it, select the disk using the following command and replacing the alphabet with the driver letter of that disk.
select disk A Select Volume A (Replace A with the Drive Letter)
- After you have successfully selected the disk, you must mark the disk as online in order to initiate the recognization process of the disk at startup. Use the following commands to do that.
Online Disk Online Volume
- Type in the following command to successfully get out of the command prompt and restart your computer after that.
Exit
- Check to see if marking the Disk as online has fixed your issue.

Method 7: Check your data cables, BIOS and drivers
Unplug all HDD data cables, and then plug them again. Revert to the previous drivers and BIOS settings if they were changed, or use “Restore factory settings” option in the BIOS. Make sure to write down all current BIOS settings that were previously selected, just in case it is required to switch back. If the error is caused by a change of the SATA disk controller’s mode in the BIOS or firmware, the fix can be as simple as entering the BIOS and toggling the SATA controller’s “mode” setting. The exact instructions differ from one manufacturer to the other, but the options will resemble what is shown in the screenshots below.
To check the boot order, follow these steps:
- Restart the computer
- Press the necessary key to open the BIOS menu. This key depends on the computer manufacturer and computer model. This is usually listed on the first screen that appears on the monitor. It can be any of the following: Esc, Del, F2, F8, F10 or F12.
- If the screen shows multiple keys, find the key to open “BIOS”, “setup” or “BIOS menu”
- Attempt to toggle between all three (or more) modes until a combination that results in Windows booting successfully once more is found.
Method 8: Boot Windows In Safe Mode
If above solutions didn’t fix the problem, then Start Windows into safe mode. This will start your PC with minimum system requirements, will not load startup programs, add-ons etc. And allow performing troubleshooting steps to fix Boot Error 0xc000000e:
Before you enter the safe mode, you need to enter the Windows Recovery Environment (winRE). To do this, you will repeatedly turn your device OFF, then ON:
- Hold down the power button for 10 seconds to turn off your device.
- Press the power button again to turn on your device.
- On the first sign that Windows has started (for example, some devices show the manufacturer’s logo when restarting) hold down the power button for 10 seconds to turn off your device.
- Press the power button again to turn on your device.
- When Windows restarts, hold down the power button for 10 seconds to turn off your device.
- Press the power button again to turn on your device.
- Allow your device to fully restart and you should boot into the Windows Recovery Environment.
Now that you are in the Windows Recovery Environment, you will follow these steps to take you to safe mode:
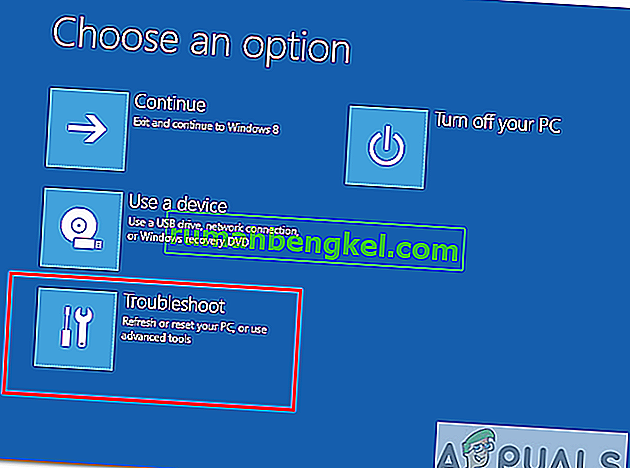
- On the Choose an option, screen, select “Troubleshoot” and then “Advanced options.”
- Now click on “Startup Settings” and click on “Restart.”
- After your device restarts, you’ll see a list of options. Select option “4” from the list or press “F4” to enter Safe Mode.

Note: If you need to exit safe mode, simply restart your device, or:
- Press the “Windows logo key + R.”
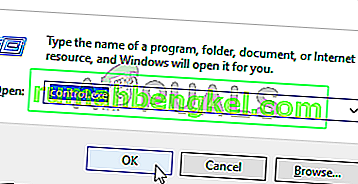
- Type “msconfig” in the Run box and then select “OK”.

- Select the Boot tab and under Boot options, clear the Safe boot checkbox.

Method 9: Check your disk with CHKDSK utility
If the hard drive has its file integrity compromised, it is possible to use built-in Windows CHKDSK utility to scan the disk and fix the file system errors.
- Connect a USB drive that has been made bootable or insert the Windows Installation Disk on your computer.
- After connecting one of these, boot from that connected device.
- After booting your computer from the device, click on “Next” and then on the “Repair your Computer” option.
- On the next window, click on “Troubleshoot” and then on the “Advanced” Option.

- On the next screen, make sure to select the “CommandPrompt” option to successfully launch into the command prompt.
- Provide the login credentials of your account in order to boot inside the cmd.
- Inside the command prompt, type in the following command to successfully run the check disk utility on your computer.
chkdsk C: /f (Make sure to replace the "C" with the Drive letter of your partition).
- Confirm any on-screen prompts and wait for the scan to be fully completed.
- Check to see if the issue is fixed by performing this step.
Method 10: Disable fast startup Feature
If your computer has been set up to use the Fast Startup feature, you might be getting this error message on your screen because of doing so. The Fast Startup feature is known to malfunction with some operating systems and hardware combinations.
Basically, when enabled, the feature automatically sends some launch configurations to be stored in your RAM to allow for a faster startup as indicated by its name but this configuration data can sometimes be corrupted which can lead to this error on your computer. Therefore, in this step, we will be disabling it completely. For that:
- Press “Windows” + “R” to open the Run prompt.
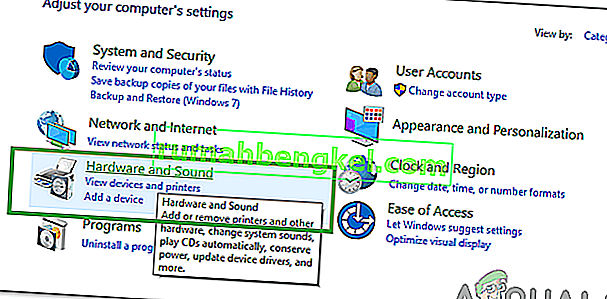
- Type in “Control Panel” and press “enter” to launch the classical Control Panel interface.
- Inside the control panel, click on the “Hardware and Sound” option and then select the “Power Options” button.
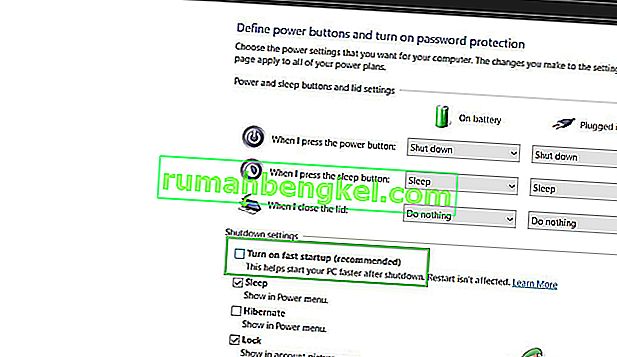
- Inside the power options, click on the “Choose what the power button does” from the left side.
- Click on the “Change Settings” option if the fast startup option is greyed out.
- Make sure to uncheck the “Turn on Fast Startup” option and save your changes.
- Closeout of the window and terminate any unnecessary applications.
- Click on the “Start Menu”, click on the “Power Options” and select “Shutdown” from the list.
- This option should completely power down your computer and after performing a complete shutdown, wait for some minutes before turning your computer back on.
- After the computer turns back on, check to see if the error message is fixed.
Note: This solution can only be applied if you are able to sometimes boot up your computer normally and are only encountering this error momentarily.


Method 11: Repair Corrupted System Files
It also possible in some situations that certain system files might have been corrupted due to a storage failure or due to some other reason. Therefore, in this step, we will be performing a complete repair of the corrupted system files and then we will check to see if doing so fixes this issue. For that:
- Press “Windows” + “R” to open the Run prompt.
- Type in “cmd” and then press “Shift” + “Ctrl” + “Enter” to launch the command prompt with admin privileges.
- Type in the following commands one by one and press “Enter” after each to successfully run an SFC scan and a DISM Scan on your computer.
DISM /Online /Cleanup-Image /RestoreHealth sfc /scannow
- Restart your computer completely once these scans are completed.
- Check to see if by performing these scans, you were able to fix this issue on your computer.

Method 12: Run Windows Startup Repair
Startup Repair is capable of diagnosing and fixing the found issues. For example, it can automatically scan system files, registry settings, configuration settings, etc. and try to fix the problem on its own. Startup Repair is especially useful when your computer is unbootable. Since your computer fails to boot, Windows can boot into WinRE automatically. While, if it doesn’t appear, you can interrupt the boot process three times in a row, and then the WinRE screen appears. Alternatively, if you have a bootable USB medium, you can also set your computer to boot from it and go to Repair your computer to enter WinRE.
After you have successfully booted into the Windows Recovery Environment, click on the “Troubleshoot” option, and from there, select the “Advanced Options” screen. Inside the advanced options, select the “StartupRepair” button to successfully initiate the Startup Repairing process. Windows will begin to diagnose your computer automatically. When the process ends, your computer will restart automatically. You can wait to see whether it can boot successfully.

Obejście: upewnij się, że żadne dodatkowe urządzenia nie są podłączone przed przejściem do wiersza poleceń lub narzędzia Startup Repair, najlepiej spróbować ponownie uruchomić komputer z jak najmniejszą liczbą urządzeń i dysków zewnętrznych podłączonych do komputera. Dzięki temu nic, co zostało ostatnio dodane do komputera, nie powoduje tego problemu. Najlepiej byłoby odłączyć wszystkie najnowsze napędy USB, płyty CD, DVD itp. Obejmuje to również czytnik kart pamięci. Upewnij się, że wszystkie dyski zewnętrzne i klucze USB lub napędy USB zostały odłączone, a następnie spróbuj ponownie.